By Darren Stones
When travelling to photograph those picture perfect locations like you see in the guidebooks, you need Mother Nature on your side to help you get the shots that you want. Everyone loves seeing images with blue skies and a few clouds, but what happens when you arrive, your time is limited, and the weather is overcast?
Research
Travel photographers usually research their chosen locations before heading off and try their best to arrive in locations when the weather conditions are suitable for attractive photography. But things do not always go according to plan.
Recently I spent some time on the Surf Coast in Victoria, and was scouting around the base of the cliff face at Rocky Point at Torquay. It is a great looking area adjacent to the Torquay Surf Club when the sun is shining – particularly in the morning.
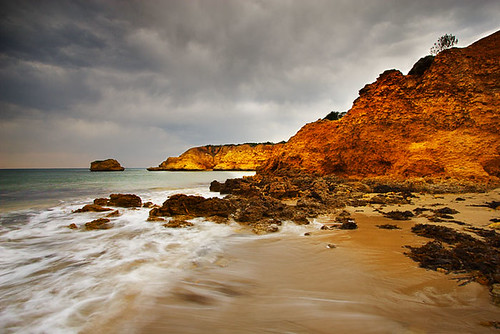
On my first day in the area, I decided to go out during the afternoon to check out some potential spots for making landscape photographs. With the clouds looking ominous, a few spots of rain began to fall. Lots of people were around on the beach to that point, and then they decided to scatter. Suited me fine, as the clouds were beginning to look more interesting and I thought I could use them to my advantage.
Filters
With the use of my polariser and graduated neutral density filters, I was able to even out the lighting and use a slow shutter speed. This allowed me to use my creativity and create an image where I could blur the water. My shoes got absolutely soaked whilst taking this shot, as I had my camera set up on my tripod on a small rock shelf and some waves were still coming over the rocks. However, I thought it was worth the effort to photograph the scene, so continued on regardless. It was safe to do so as the tide was going out.
Creativity
So my advice to photographers is that when the weather begins to turn sour, don't run for cover so quickly. Stay behind and work the area with your creative hat on. By using a tripod you will be giving yourself time to slow down and analyse the scene, plus use those slower shutter speeds to create the sense of movement in the water.
If the rain is just a few spots, like it was for me during this shoot, protect your camera with a small cover such as a handkerchief. It worked fine for me and I left satisfied at having created a new photograph.
Photograph details:
Camera: Canon EOS 20D Body
Lens: Canon EF-S 10-22mm f/3.5-4.5 USM Lens
Filters: Polariser, Lee Graduated Neutral Density .9ND G S
Exposure: f/16, 0.8sec, ISO-100, RAW
Other: Manfrotto 190PROB Tripod, Canon Remote Switch RS-80N3
Improving Your Image Through Visual Communications
Journalist - Photographer - Writer
Showing posts with label photographyadvice. Show all posts
Tuesday, 18 October 2011
Sunday, 4 April 2010
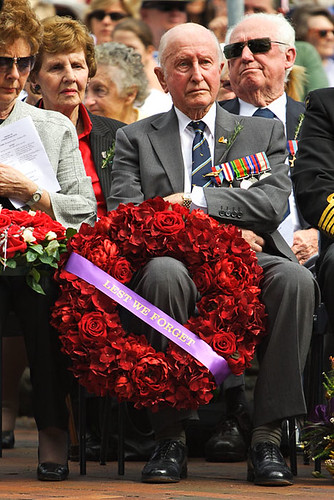
5 tips for photographing Anzac Day
By Darren Stones
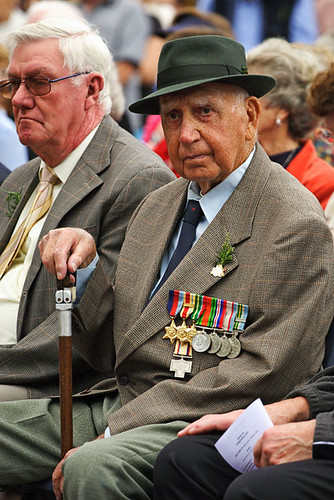
Travel photography involves more than photos of sunsets, landscapes and architecture, but most photographers seem hesitant to photograph people they don’t know. People are an integral part of a city or town’s heartbeat, and people are inquisitive by nature and enjoy looking at photos of people. Major outdoor events in cities and towns are prime opportunities for photographers to undertake travel photography as it’s relatively easy to blend in with large crowds. With some research under your belt, and suitable equipment for the task, consider photographing an Anzac Day march and ceremony.
On Anzac Day in recent years, I’ve been away from home undertaking travel photography in VIC, ACT and NSW. The primary purpose was to photograph the splendid autumn colours on display; however my mind was fixed on expanding my photographic library.
In 2009, I was visiting Kiama in NSW and decided to photograph the local Anzac Day march and ceremony. Being from out of town, I had no idea where the march would start and finish. I headed out early for a coffee at a local café and began chatting to the locals so I could ascertain where the march would start and finish. The march was scheduled to commence at the Kiama Town Hall, head north-east along Manning Street, turn left at the roundabout into Terralong Street, and proceed to the imposing Memorial Arch at the intersection of Collins and Terralong Streets.
I surveyed the streets for an hour-and-a-half before the march searching for positions which would avoid distracting backgrounds in my photographs. Before the march commenced, the clouds rolled in and lighting conditions became favourable as harsh shadows disappeared from people’s faces.
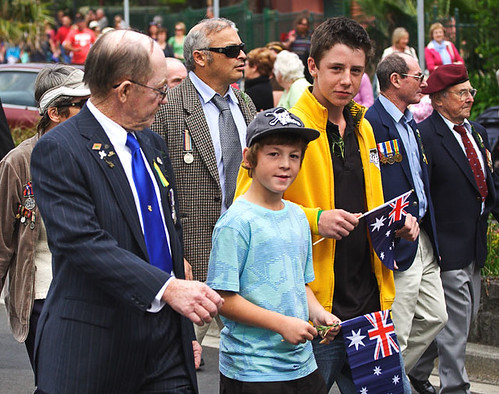
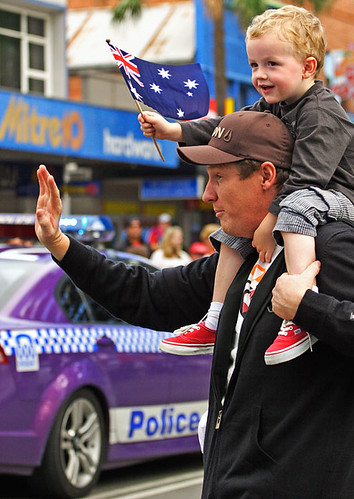
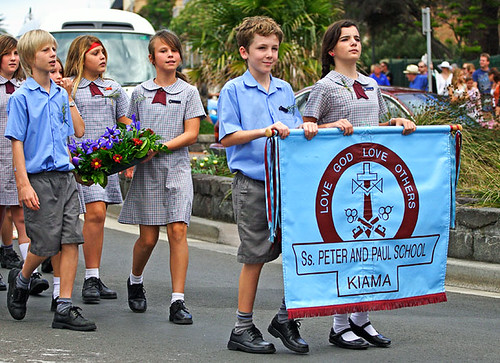
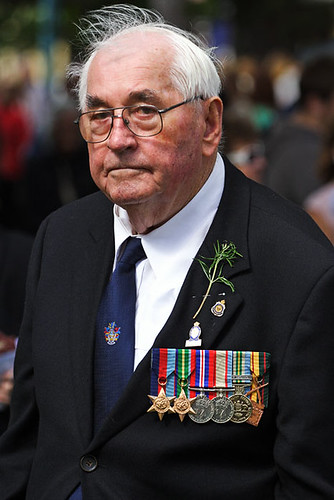
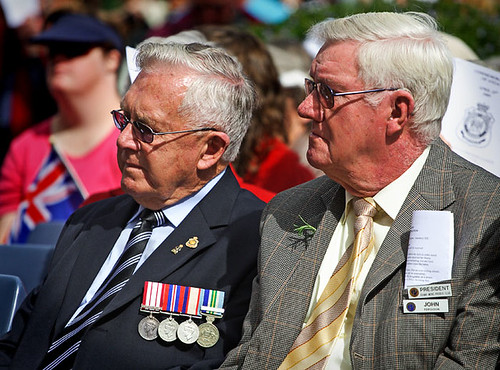
With youngsters waving Australian flags, school children carrying banners, teenagers and family members wearing medals, older vets being pushed in wheelchairs, and proud returned service men and women marching, there were numerous opportunities to take photos.
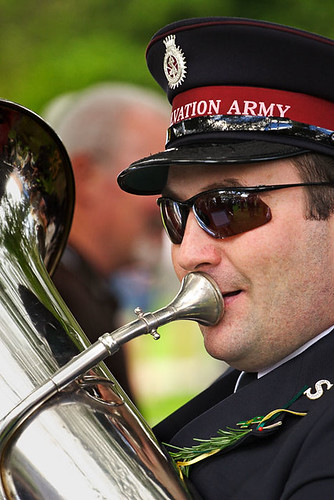
The Salvation Army Band was in attendance, and this later provided opportunities for close-up shots of musicians playing instruments. With a broad age range of people marching, and later congregated for the official ceremony, I believe it was an interesting event to photograph. I trust the following tips inspire you to photograph on Anzac Day.
No. 1 – Look for interesting faces
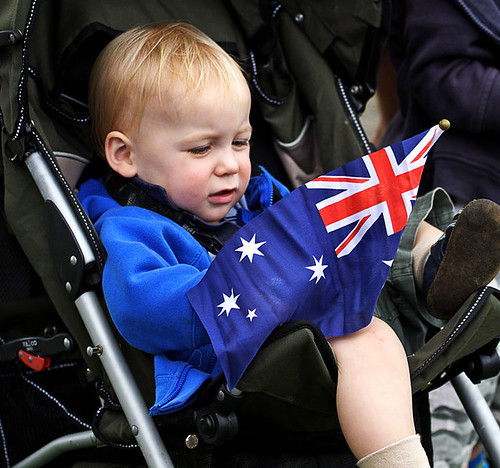
Children who have a look of excitement on their faces tend to be good photographic subjects in a crowd. If you see a child waving a small Australian flag, keep your camera pointed towards them for a while and take a few shots. You may not realise it at the time whether you’ve captured an interesting facial expression, so the trick is to keep shooting.
No. 2 – Equipment to use
Travel photographers use a range of lenses, however some prefer to use one camera and one lens when photographing an outdoor event. By doing so, it allows you to concentrate on the subject matter and be less concerned with equipment. Zoom lenses in the range of 70-200mm are a popular choice as they provide versatility whilst walking around. Depth of field is a major factor and the best photos tend to be those which are taken with a shallow depth of field. Anywhere in the range of f/2.8-f/5.6 seems to produce pleasing results. A wide-angle zoom is handy if you can position yourself close to the action. You can produce dynamic portraits by moving in close and using a wide-angle setting. A second camera body is ideal as it can eliminate the need to changing lenses. If you use one body only, it may be best to use a lens in the range of 70-200mm.
No. 3 – Camera settings
I prefer to keep camera settings simple for these types of events. I use aperture priority, set the aperture to f/4, and adjust the ISO as conditions change. Outdoor events generally allow for shooting 100-400 ISO, with preference given to shooting an ISO as low as possible. Shutter speeds are critical for sharpness, and my preference is to shoot at 1/500sec and faster.
No. 4 – The angle of light
Finding the ideal positions to photograph people at Anzac Day processions can be difficult, however the most important advice I can offer is to keep the sun at your back. This will help alleviate sun flare in your photos, blown out highlights in the background, and dark shadows on faces.
No. 5 – Be respectful and have fun
Anzac Day is a day of reflection, and is probably Australia’s most patriotic day. My experience is that people are not surprised to have their photograph taken on this day when attending events. Be respectful and acknowledge someone if you make eye contact. A nod of the head and brief smile will put people at ease. Wear an Anzac badge and do your best to blend in with the crowd. Lest We Forget.
Travel photography involves more than photos of sunsets, landscapes and architecture, but most photographers seem hesitant to photograph people they don’t know. People are an integral part of a city or town’s heartbeat, and people are inquisitive by nature and enjoy looking at photos of people. Major outdoor events in cities and towns are prime opportunities for photographers to undertake travel photography as it’s relatively easy to blend in with large crowds. With some research under your belt, and suitable equipment for the task, consider photographing an Anzac Day march and ceremony.
On Anzac Day in recent years, I’ve been away from home undertaking travel photography in VIC, ACT and NSW. The primary purpose was to photograph the splendid autumn colours on display; however my mind was fixed on expanding my photographic library.
In 2009, I was visiting Kiama in NSW and decided to photograph the local Anzac Day march and ceremony. Being from out of town, I had no idea where the march would start and finish. I headed out early for a coffee at a local café and began chatting to the locals so I could ascertain where the march would start and finish. The march was scheduled to commence at the Kiama Town Hall, head north-east along Manning Street, turn left at the roundabout into Terralong Street, and proceed to the imposing Memorial Arch at the intersection of Collins and Terralong Streets.
I surveyed the streets for an hour-and-a-half before the march searching for positions which would avoid distracting backgrounds in my photographs. Before the march commenced, the clouds rolled in and lighting conditions became favourable as harsh shadows disappeared from people’s faces.
With youngsters waving Australian flags, school children carrying banners, teenagers and family members wearing medals, older vets being pushed in wheelchairs, and proud returned service men and women marching, there were numerous opportunities to take photos.
The Salvation Army Band was in attendance, and this later provided opportunities for close-up shots of musicians playing instruments. With a broad age range of people marching, and later congregated for the official ceremony, I believe it was an interesting event to photograph. I trust the following tips inspire you to photograph on Anzac Day.
No. 1 – Look for interesting faces
Children who have a look of excitement on their faces tend to be good photographic subjects in a crowd. If you see a child waving a small Australian flag, keep your camera pointed towards them for a while and take a few shots. You may not realise it at the time whether you’ve captured an interesting facial expression, so the trick is to keep shooting.
No. 2 – Equipment to use
Travel photographers use a range of lenses, however some prefer to use one camera and one lens when photographing an outdoor event. By doing so, it allows you to concentrate on the subject matter and be less concerned with equipment. Zoom lenses in the range of 70-200mm are a popular choice as they provide versatility whilst walking around. Depth of field is a major factor and the best photos tend to be those which are taken with a shallow depth of field. Anywhere in the range of f/2.8-f/5.6 seems to produce pleasing results. A wide-angle zoom is handy if you can position yourself close to the action. You can produce dynamic portraits by moving in close and using a wide-angle setting. A second camera body is ideal as it can eliminate the need to changing lenses. If you use one body only, it may be best to use a lens in the range of 70-200mm.
No. 3 – Camera settings
I prefer to keep camera settings simple for these types of events. I use aperture priority, set the aperture to f/4, and adjust the ISO as conditions change. Outdoor events generally allow for shooting 100-400 ISO, with preference given to shooting an ISO as low as possible. Shutter speeds are critical for sharpness, and my preference is to shoot at 1/500sec and faster.
No. 4 – The angle of light
Finding the ideal positions to photograph people at Anzac Day processions can be difficult, however the most important advice I can offer is to keep the sun at your back. This will help alleviate sun flare in your photos, blown out highlights in the background, and dark shadows on faces.
No. 5 – Be respectful and have fun
Anzac Day is a day of reflection, and is probably Australia’s most patriotic day. My experience is that people are not surprised to have their photograph taken on this day when attending events. Be respectful and acknowledge someone if you make eye contact. A nod of the head and brief smile will put people at ease. Wear an Anzac badge and do your best to blend in with the crowd. Lest We Forget.
Saturday, 29 August 2009
5 tips for taking better travel photographs
By Darren Stones
When travelling, photography can be an integral part of your journey. Sure, we all enjoy savouring the sights, tastes and tourist hot spots, however travel photography provides opportunity to create and enjoy a memorable experience.
Here's 5 tips to assist you to take better travel photographs:
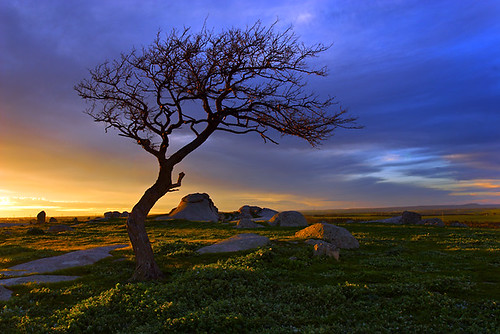
No. 1 – Use the golden hour for better landscape scenes
Serious landscape photographers utilise the golden hour to their advantage. Inspect the best landscape photographs, and you’ll notice that the sun is generally low in the sky. The first and last sunlit hour of the day produces a softer light for quality landscapes.
Even though photographing during these times can be difficult due to a busy travel schedule, make the effort and you’ll be rewarded with better quality images.
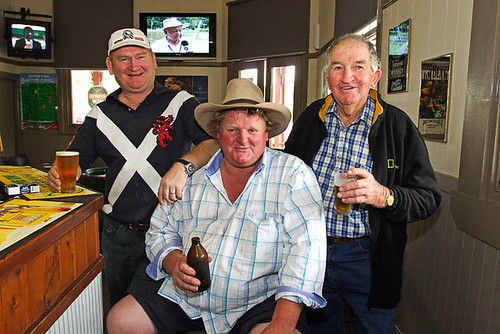
No. 2 – Photograph people
Taking photos of people is a vital part of travel photography. People like to know about people and they like to know what they look like. So, take people photos and expand your portfolio.
A city or town is about its people and culture – not just its buildings and scenery. Walk around with a smile, greet people as you pass them, and become part of the surroundings.
If you see someone engaged in an activity, approach them in a friendly manner. Introduce yourself and tell them you’re a visitor to the region. Tell them you’re a travel photographer who likes to take photos of people. Ask if you can take their photograph as they’re engaged in an activity. Go in close with a wide-angle zoom to create a dynamic portrait.
No. 3 – Stick around for sunset, and linger a little longer
When travelling, most people don’t take photographs at sunset, preferring to dine and savour a region’s tastes. Take a look behind you when the sun is setting as it may be highlighting buildings or trees.
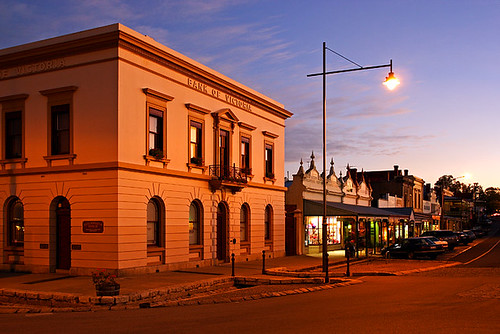
Sometimes the best photographs are taken during sunset. Stay for the afterglow, because this can assist in producing unique architectural shots. With fading light, and street lights aglow, it’s an ideal time to photograph buildings.
No. 4 – Image format
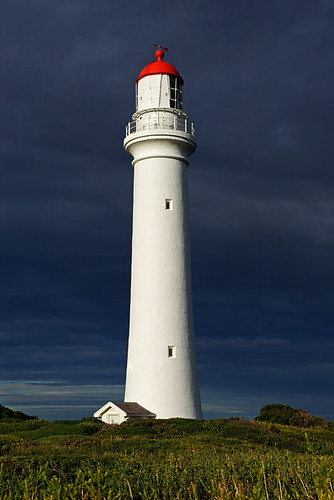
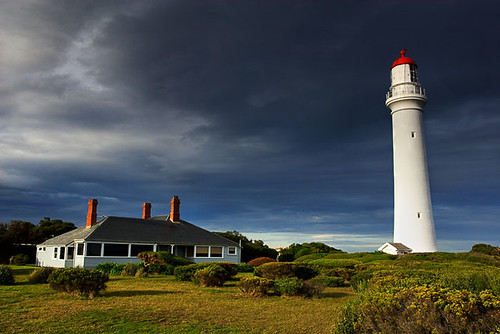
Some subjects look better in portrait format compared to landscape. If in doubt, shoot both formats. When you’re home analysing your photos on the computer decide which looks best. For instance: lighthouses can be framed tightly in portrait format, or, framed in landscape with interesting surroundings.
No. 5 – Less is more
I believe the best travel photos are uncluttered and simple in composition. There’s a tendency amongst less experienced photographers to try and fit everything in, with the eventual image becoming a lot of tiny objects.
I’ll share a method I use. At times, I’ll slowly walk around with the camera to my eye searching for a strong composition. Of course when doing this, take care of where you walk, otherwise you could end up on your backside or over a cliff.
Commence planning your next journey with the intention to create attractive travel photographs. Research the places you intend to visit via the internet, newspapers, magazines and travel guidebooks.
Sharpen your photographic eye before you leave by photographing in your local area or nearby region. Increase your chances of producing quality travel images by researching, preparing and skilfully executing.
Happy travels.
View the Darren Stones Australian Travel Photography video on YouTube.
When travelling, photography can be an integral part of your journey. Sure, we all enjoy savouring the sights, tastes and tourist hot spots, however travel photography provides opportunity to create and enjoy a memorable experience.
Here's 5 tips to assist you to take better travel photographs:
No. 1 – Use the golden hour for better landscape scenes
Serious landscape photographers utilise the golden hour to their advantage. Inspect the best landscape photographs, and you’ll notice that the sun is generally low in the sky. The first and last sunlit hour of the day produces a softer light for quality landscapes.
Even though photographing during these times can be difficult due to a busy travel schedule, make the effort and you’ll be rewarded with better quality images.
No. 2 – Photograph people
Taking photos of people is a vital part of travel photography. People like to know about people and they like to know what they look like. So, take people photos and expand your portfolio.
A city or town is about its people and culture – not just its buildings and scenery. Walk around with a smile, greet people as you pass them, and become part of the surroundings.
If you see someone engaged in an activity, approach them in a friendly manner. Introduce yourself and tell them you’re a visitor to the region. Tell them you’re a travel photographer who likes to take photos of people. Ask if you can take their photograph as they’re engaged in an activity. Go in close with a wide-angle zoom to create a dynamic portrait.
No. 3 – Stick around for sunset, and linger a little longer
When travelling, most people don’t take photographs at sunset, preferring to dine and savour a region’s tastes. Take a look behind you when the sun is setting as it may be highlighting buildings or trees.
Sometimes the best photographs are taken during sunset. Stay for the afterglow, because this can assist in producing unique architectural shots. With fading light, and street lights aglow, it’s an ideal time to photograph buildings.
No. 4 – Image format
Some subjects look better in portrait format compared to landscape. If in doubt, shoot both formats. When you’re home analysing your photos on the computer decide which looks best. For instance: lighthouses can be framed tightly in portrait format, or, framed in landscape with interesting surroundings.
No. 5 – Less is more
I believe the best travel photos are uncluttered and simple in composition. There’s a tendency amongst less experienced photographers to try and fit everything in, with the eventual image becoming a lot of tiny objects.
I’ll share a method I use. At times, I’ll slowly walk around with the camera to my eye searching for a strong composition. Of course when doing this, take care of where you walk, otherwise you could end up on your backside or over a cliff.
Commence planning your next journey with the intention to create attractive travel photographs. Research the places you intend to visit via the internet, newspapers, magazines and travel guidebooks.
Sharpen your photographic eye before you leave by photographing in your local area or nearby region. Increase your chances of producing quality travel images by researching, preparing and skilfully executing.
Happy travels.
View the Darren Stones Australian Travel Photography video on YouTube.
Friday, 28 August 2009
What is a good travel photograph?
By Darren Stones
I’m no expert on the matter, so don’t shoot me – please. When looking at travel photographs I look for a definite subject. How many times have we seen a beautiful sunset photograph which doesn’t contain a subject of interest within the frame?
Photographs of beautiful sunsets are common, but what lifts an image above others in the pack? Usually, it’s a definite subject in the frame besides that of the lovely coloured clouds and sky.
Large black areas without detail in a photograph tend to detract from an image. Photography is all about light, and the skilful use of it enhances the subject matter you’re photographing. The less black areas in your photos the better – I believe.
Whether it’s an outdoor candid portrait, a landscape or seascape, a building or other architectural feature, lighthouse, etc., the good use of light is paramount in impressing viewers of your images. View good travel photography and analyse why you like particular images. Where will you find good travel photography? Travel guide books, newspaper travel lift-outs, travel magazines, travel brochures, and the like.
Include a definite subject in the frame which creates interest in your travel photograph.
I view many travel photographs each month, and the one’s that impress me are those that have a definite subject that’s well lit, interesting and not over manipulated. Large black areas in a travel photograph are not really conducive to holding my attention, so I generally move on to other images quite quickly.
Of course this is just my opinion; however I believe I have a better idea of what is an attractive travel photograph as compared to 10 years ago. I suppose this has come from years of viewing published photographs, practical experience, being published in various publications, received awards and sold and licensed images. No intent to blow my trumpet, just giving some sort of background to how I’ve developed.
In travel photography, it’s best to create images which are a true representation of the subject as they are the images which seem most attractive to people.
One of the best ways to improve your travel photography is to actively seek a critique. Internet forums are an excellent avenue to seek opinion on your work, and if you spare time to give some advice to your peers, you’ll generally receive such in return.
So, put your work out there for others to view, actively seek a critique, and give a bit back to those who assist you. What have you got to lose? Quite frankly, I think you’ve got plenty to gain from the interactive experience. You’ll be on your way to making better travel photographs.
Here are two sites where my Australian travel photography is exhibited:
Online print sales gallery: http://dgstones.redbubble.com/
Flickr Photography Gallery: www.flickr.com/photos/photojour
I’m no expert on the matter, so don’t shoot me – please. When looking at travel photographs I look for a definite subject. How many times have we seen a beautiful sunset photograph which doesn’t contain a subject of interest within the frame?
Photographs of beautiful sunsets are common, but what lifts an image above others in the pack? Usually, it’s a definite subject in the frame besides that of the lovely coloured clouds and sky.
Large black areas without detail in a photograph tend to detract from an image. Photography is all about light, and the skilful use of it enhances the subject matter you’re photographing. The less black areas in your photos the better – I believe.
Whether it’s an outdoor candid portrait, a landscape or seascape, a building or other architectural feature, lighthouse, etc., the good use of light is paramount in impressing viewers of your images. View good travel photography and analyse why you like particular images. Where will you find good travel photography? Travel guide books, newspaper travel lift-outs, travel magazines, travel brochures, and the like.
Include a definite subject in the frame which creates interest in your travel photograph.
I view many travel photographs each month, and the one’s that impress me are those that have a definite subject that’s well lit, interesting and not over manipulated. Large black areas in a travel photograph are not really conducive to holding my attention, so I generally move on to other images quite quickly.
Of course this is just my opinion; however I believe I have a better idea of what is an attractive travel photograph as compared to 10 years ago. I suppose this has come from years of viewing published photographs, practical experience, being published in various publications, received awards and sold and licensed images. No intent to blow my trumpet, just giving some sort of background to how I’ve developed.
In travel photography, it’s best to create images which are a true representation of the subject as they are the images which seem most attractive to people.
One of the best ways to improve your travel photography is to actively seek a critique. Internet forums are an excellent avenue to seek opinion on your work, and if you spare time to give some advice to your peers, you’ll generally receive such in return.
So, put your work out there for others to view, actively seek a critique, and give a bit back to those who assist you. What have you got to lose? Quite frankly, I think you’ve got plenty to gain from the interactive experience. You’ll be on your way to making better travel photographs.
Here are two sites where my Australian travel photography is exhibited:
Online print sales gallery: http://dgstones.redbubble.com/
Flickr Photography Gallery: www.flickr.com/photos/photojour
Monday, 1 December 2008
Digital camera sensor cleaning and those rascally rabbits
By Darren Stones
Camera maintenance is an important habit to get into, but of course no one has to be too meticulous about it. Hell, housework is certainly not my strong point.
This morning I gave my baby (Canon 20D) a spruce up. I thought it was perfect timing with the sun shining and a stunning blue sky – just as you’d expect in Melbourne. Of course at time of writing the clouds have rolled in to provide a diffusing effect to the scenery.
The camera sensor was due for a little dust removal. So, off I toddled with the 50mm prime lens attached and I set the camera to manual mode and proceeded to take exposures at F/22. F/22 is perfect for revealing those dust bunnies. You know the one’s, those darn spots that we remove in photoshop and are a right pain in the ass. What fun – not.
Anyway, I soon found a big dust bunny had come to the party. The bloody thing was bigger than Bugs Bunny. Huh, that big bugger was in fact on the rear lens element, so after a few exposures rocket science (a brain wave) soon dictated that he/she had to be exterminated with a quick wipe with a soft lens cloth. Done.
Onwards we go to a little fiddling in photoshop and a play with the auto levels option. That was interesting to say the least and clearly revealed those dastardly bunnies at their worst. After a few goes at exterminating them I have a relatively clean baby all ready to take for a spin.
Click images below for a larger view.
I use the Copper Hill kit products as supplied by Quality Cameras in Perth. I have no affiliation with them, but can recommend their prompt and courteous service and cleaning kit products.
Of course I couldn’t get rid of all the bunnies, so I suspect the mummy and daddy bunny will make more little bunnies for me to exterminate in the future. Those rascally rabbits.
Some great info here to assist.
http://www.pbase.com/copperhill/ccd_cleaning
And this is the way I do it.
http://www.pbase.com/copperhill/image/71784128
Advice articles can be found on my site here
Camera maintenance is an important habit to get into, but of course no one has to be too meticulous about it. Hell, housework is certainly not my strong point.
This morning I gave my baby (Canon 20D) a spruce up. I thought it was perfect timing with the sun shining and a stunning blue sky – just as you’d expect in Melbourne. Of course at time of writing the clouds have rolled in to provide a diffusing effect to the scenery.
The camera sensor was due for a little dust removal. So, off I toddled with the 50mm prime lens attached and I set the camera to manual mode and proceeded to take exposures at F/22. F/22 is perfect for revealing those dust bunnies. You know the one’s, those darn spots that we remove in photoshop and are a right pain in the ass. What fun – not.
Anyway, I soon found a big dust bunny had come to the party. The bloody thing was bigger than Bugs Bunny. Huh, that big bugger was in fact on the rear lens element, so after a few exposures rocket science (a brain wave) soon dictated that he/she had to be exterminated with a quick wipe with a soft lens cloth. Done.
Onwards we go to a little fiddling in photoshop and a play with the auto levels option. That was interesting to say the least and clearly revealed those dastardly bunnies at their worst. After a few goes at exterminating them I have a relatively clean baby all ready to take for a spin.
Click images below for a larger view.

Sensor before cleaning with auto levels adjustment in Photoshop

Sensor after cleaning with auto levels adjustment in Photoshop
I use the Copper Hill kit products as supplied by Quality Cameras in Perth. I have no affiliation with them, but can recommend their prompt and courteous service and cleaning kit products.
Of course I couldn’t get rid of all the bunnies, so I suspect the mummy and daddy bunny will make more little bunnies for me to exterminate in the future. Those rascally rabbits.
Some great info here to assist.
http://www.pbase.com/copperhill/ccd_cleaning
And this is the way I do it.
http://www.pbase.com/copperhill/image/71784128
Advice articles can be found on my site here
Monday, 17 November 2008
Photography with the Canon 20D and Canon 10-22mm lens
By Darren Stones
I’ve been asked a few times lately what lens I’m using on some of my latest photographs. So I thought I’d take this opportunity to share some information.
My camera of choice for these photographs is the Canon 20D and it’s coupled with the Canon EF-S 10-22mm lens. The Canon 20D has a 1.6 crop factor which effectively means the 10-22mm lens becomes a 16-35mm lens.
The 10-22mm lens allows the photographer to go in close to subject matter and fill the frame, which is great for tight situations and to create a more dynamic composition. It does take a little getting used to and one must be careful to avoid having tripod legs and even the photographer’s feet included in the frame.
Hope that helps a little folks. You’re most welcome to ask questions and I’ll endeavour to do my best to answer them.
I’ve been asked a few times lately what lens I’m using on some of my latest photographs. So I thought I’d take this opportunity to share some information.

Port Campbell National Park
Focal length 10mm
My camera of choice for these photographs is the Canon 20D and it’s coupled with the Canon EF-S 10-22mm lens. The Canon 20D has a 1.6 crop factor which effectively means the 10-22mm lens becomes a 16-35mm lens.

Twelve Apostles
Focal length 22mm
The 10-22mm lens allows the photographer to go in close to subject matter and fill the frame, which is great for tight situations and to create a more dynamic composition. It does take a little getting used to and one must be careful to avoid having tripod legs and even the photographer’s feet included in the frame.

Gordon Stones
Focal length 10mm
Hope that helps a little folks. You’re most welcome to ask questions and I’ll endeavour to do my best to answer them.
Wednesday, 1 February 2006
Photography advice and tips
By Darren Stones
A series of articles dedicated to photography advice and tips. I cordially invite newspaper and magazine editors, and other interested parties to contact me if interested in seeking my professional services for this column.
Digital camera sensor cleaning and those rascally rabbits
What is a good travel photograph?
5 tips for taking better travel photographs
5 tips for photographing Anzac Day
Bad weather can make for good travel photography
A series of articles dedicated to photography advice and tips. I cordially invite newspaper and magazine editors, and other interested parties to contact me if interested in seeking my professional services for this column.
Digital camera sensor cleaning and those rascally rabbits
What is a good travel photograph?
5 tips for taking better travel photographs
5 tips for photographing Anzac Day
Bad weather can make for good travel photography
Subscribe to:
Posts (Atom)